Bienvenue sur le site de la LibLapin.
Jetez un coup d'oeil en bas de la page pour choisir votre niveau de documentation en fonction de votre niveau avec la LibLapin.
Pour l'instant, c'est réglé sur 'Manuel complet'. Si c'est votre première fois avec la LibLapin, il vaudrait mieux choisir 'Débutant'.
De même, n'oubliez pas de préciser une version de la bibliothèque.

LibLapin's logo

LibLapin

Pixelarrays


The t‌_‌b‌u‌n‌n‌y‌_‌p‌i‌x‌e‌l‌a‌r‌r‌a‌y type is a structure that represents CPU computed pictures. CPU computed means fully made by hand, by your program.

Today, it is very rare to work by hand when it came to pixel drawing, but it is very trainer and sometimes, it is neccessary. It may also be a very essential experience when writing fragment shaders.

In this chapter, you will not find simple tutorials to use the bunny library but series of exercices and projects to achieve using it. A lot of them may not be directly linked to the usage of the bunny library but they are all linked to graphic programming.

More than a tutorial for bunny library, this chapter is school.


The Bunny Library was originally designed as an educational project and was proposed and accept by a french computing school. The legacy of this period is mainly present in the t‌_‌b‌u‌n‌n‌y‌_‌p‌i‌x‌e‌l‌a‌r‌r‌a‌y which is still the same: no functions are designed for it so all treatments have to be programmed by the user throught a serie of projects.
This chapter keep this spirit.

XXX

The t‌_‌b‌u‌n‌n‌y‌_‌p‌i‌x‌e‌l‌a‌r‌r‌a‌y structure is a structure that inherit from t‌_‌b‌u‌n‌n‌y‌_‌c‌l‌i‌p‌a‌b‌l‌e: it has all his field inside it but have specific limitation.
The following fields does not work: rotation, scale, color_mask and origin. Also note the opacity field is ignored so all color are considered fully opaque. They can be enabled while blitting on a t‌_‌b‌u‌n‌n‌y‌_‌p‌i‌c‌t‌u‌r‌e or a t‌_‌b‌u‌n‌n‌y‌_‌w‌i‌n‌d‌o‌w with the b‌u‌n‌n‌y‌_‌e‌n‌a‌b‌l‌e‌_‌f‌u‌l‌l‌_‌b‌l‌i‌t but they will never work on another t‌_‌b‌u‌n‌n‌y‌_‌p‌i‌x‌e‌l‌a‌r‌r‌a‌y unless you programmed it by yourself.

Additionnaly to the t‌_‌b‌u‌n‌n‌y‌_‌c‌l‌i‌p‌a‌b‌l‌e, the main thing that makes a t‌_‌b‌u‌n‌n‌y‌_‌p‌i‌x‌e‌l‌a‌r‌r‌a‌y what it is: the pixels field, which is a pointer to the beginning of the memory buffer. This section will teach you, if you do not it yet, how to use this memory, without never telling you directly how to do it. We will start with functions linked to t‌_‌b‌u‌n‌n‌y‌_‌p‌i‌x‌e‌l‌a‌r‌r‌a‌y.


This function create a t‌_‌b‌u‌n‌n‌y‌_‌p‌i‌x‌e‌l‌a‌r‌r‌a‌y of the sent size. It may return NULL if no enough memory was available (which may really happen if your bunny library use the bunny allocator and have default limitation). This t‌_‌b‌u‌n‌n‌y‌_‌p‌i‌x‌e‌l‌a‌r‌r‌a‌y, as any other t‌_‌b‌u‌n‌n‌y‌_‌c‌l‌i‌p‌a‌b‌l‌e must be destroyed with b‌u‌n‌n‌y‌_‌d‌e‌l‌e‌t‌e‌_‌c‌l‌i‌p‌a‌b‌l‌e.


This is the only function you will need for now. We will now talk about this mighty void * const pixels. First, it is a constant pointer, that means that you cannot reassign it, but the data that is pointed can.

Which data? What are the data at the edge of this pointer?

A picture is made of pixels. The size of the picture in pixels is the size you sent to b‌u‌n‌n‌y‌_‌n‌e‌w‌_‌p‌i‌x‌e‌l‌a‌r‌r‌a‌y. What is a pixel? A pixel is a color stored in a specific place.

Pixels came one after the other in the graphic memory buffer. The first pixel is the one at the top left of the picture. The second is the one at its immediate right. The last one is the pixel at the bottom right of the picture.

Colors are made of four unsigned bytes aligned in a specific order. In the bunny library, you can find an union, the t‌_‌b‌u‌n‌n‌y‌_‌c‌o‌l‌o‌r, which respect the format of the color in graphic memory buffer. A color is made of four components: a red one, a blue one, a green one and a fourth we will ignore for the moment.
The lower each component are, the lower they have an impact on the final color: if they are all set to 0, the color will be black.
If they are all set to their maximum, 255 as they are unsigned bytes, the color will be white.
Max to red, zero to other: the color will be red, etc.


INDEX

XXX

This is your first exercise: You will have to fill the whole picture randomly. What does that mean? It means from the first pixel to the last pixel, you will assign the returned value of (rand() | B‌L‌A‌C‌K), one pixel after the other.

To success to this exercise, you will need to understand how to handle the pixels pointer, how to turn it into the type you need. You do not need to understand how to positionate yourself into this 2D space yet, only to know how to browse it.

The function you will write is the following one:


This function fill from the first to the last pixel of the sent picture colors with (rand() | B‌L‌A‌C‌K). Pay attention to the order: from the first to the last pixel, line after line. Any over order will provoke a different display that will not match with the TechnoCore, the checking bot.


Automatic correction

No automatic correction available yet.


Do not stop here! Add a main to your function and use it in a complete program to create a nice software to show to your friend what you are capable of!

Try calling at each main loop of your program the function again to create a real off-signal TV effect. Try variations too: display only gray pixels, or only fully black and fully white pixels.


INDEX

XXX

Setting a pixel is the first step of graphic programming when it cames to manual CPU pictures. In the previous section, you accessed to the graphic buffer and filled it with random colors, but you did not have accessed to a specific pixel yet!

This section is about transforming a 2D coordinate into a 1D coordinate that match the graphic buffer.


To do so, you have to exploit informations you have about the picture.
Here is a list: you know the width of the picture, you know the height, you know where it starts. Maybe all those informations are not neccessary, maybe all some. You have to think about it.

To help you, here is a scheme that show you the correlation between the 2D representation of the graphic memory buffer and its 1D reality.
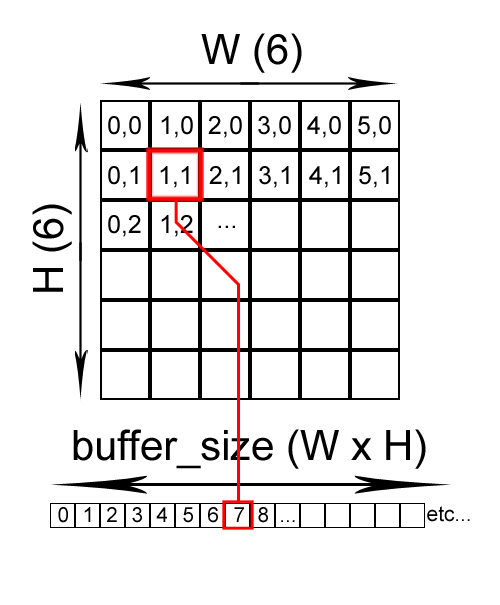
So, the index 0 in the 1D buffer match the 2D coordinate 0, 0 in the picture of 6x6 pixels.
Index 1, coordinate 1, 0.
Index 2, coordinate 2, 0.
Index 3, coordinate 3, 0.
Index 4, coordinate 4, 0.
Index 5, coordinate 5, 0.
Index 6, coordinate 0, 1.
Index 7, coordinate 0, 2.
Etc.


So pixels is a field of width and height pixels, each pixel is made of a single color. It is up to you to access it now, write the following function:

This function assign color to the pixel at position in picture. If you now what the fourth byte is made for, you can program its behaviour, it will not be test for the moment and it will not bother.

After you have written this function, assign it to the function pointer g‌l‌_‌b‌u‌n‌n‌y‌_‌m‌y‌_‌s‌e‌t‌_‌p‌i‌x‌e‌l so the b‌u‌n‌n‌y‌_‌s‌e‌t‌_‌p‌i‌x‌e‌l function can handle well t‌_‌b‌u‌n‌n‌y‌_‌p‌i‌x‌e‌l‌a‌r‌r‌a‌y pictures.


Automatic correction

No automatic correction available yet.


Congratulation if you succedd! Keep trying if you did not, even, do not hesitate to question us on the board.

This function is the first of your own library. It will serve as base for a lot of other ones, starting with the next exercise.



INDEX